
How to Install WordPress Theme 2026 (+Error Solutions)
If you are looking for “How to install WordPress theme,” then you got it right. In this blog, we describe multiple ways to install a WordPress theme. Moreover, we also added solutions for the common errors. Now, this blog might be longer than a regular tutorial blog. You can see the table of contents and go to the exact method you need.
Generally, we install the theme from the WordPress directory. However, in some cases, we may need to install WordPress themes in different ways. It’s always better to know all of them. Especially if you are a non-technical person, know the methods. It might be helpful for your future steps.
How to Install WordPress Theme 2026
No matter whether you are starting a new site or updating the old one, you need a design. WordPress themes are the helper to present your design. In fact, it’s required by default to have a theme on a WordPress site. You will get twenty-two WordPress themes by default when installing WordPress. In order to change the theme, you need to install a new WordPress theme on your site.
As you have searched for “How to install WordPress theme,” we think you are looking for a tutorial on WordPress theme installations. WordPress is a drag-and-drop CMS platform and the theme enables you to design the site visually.
We assume you have installed WordPress already on your site or local host. In case, you are not, check our tutorial. Here you can learn how to install WordPress. The following methods are applicable for both the local host and the live server. Please keep in mind that, for local host installation, you may need an internet connection in some particular cases. We will give a note for those cases.
How to Install WordPress Theme from WP Directory
The most traditional way of installing WordPress themes is installing from the WordPress directory. Log in to your WordPress website and go to the dashboard. On the left-side menu, you can see the option “Appearance”. Click on the option or hover over it. After that, you can see the theme option. Click on it.

On the next page, you can see the “Add New” options. Click on it. In case, if you want to install the old theme then you can search on the box. Also, the earlier installed themes available in this page.

Now, when you click on “Add New”, it will take you to the WordPress theme directory page. Search and find your best-fit themes. You can use multiple filtering options as well as the search box. If you already know the theme name, then better to search for it. It will save you time.

The selected theme needs to be installed now. Before installing the theme, you can check the previews. But here you can see the preview based on your running website’s content. So, it does not feel conventional. You can check the theme details and search for the theme owner’s website. Most of the time, they add a demo theme on their website.

After installing the theme, you need to activate the theme. You are done! The theme options are now available in your WordPress dashboard. Congrats
How to Install WordPress Theme from Download
Sometimes, your theme is not in the WordPress directory. For example, you bought a premium theme. Or you downloaded it from a theme company. In that case, you get the theme as a ZIP file. You can upload this ZIP file from the dashboard.
First, download the theme from the seller’s website. Keep the ZIP file on your computer. Do not unzip it.
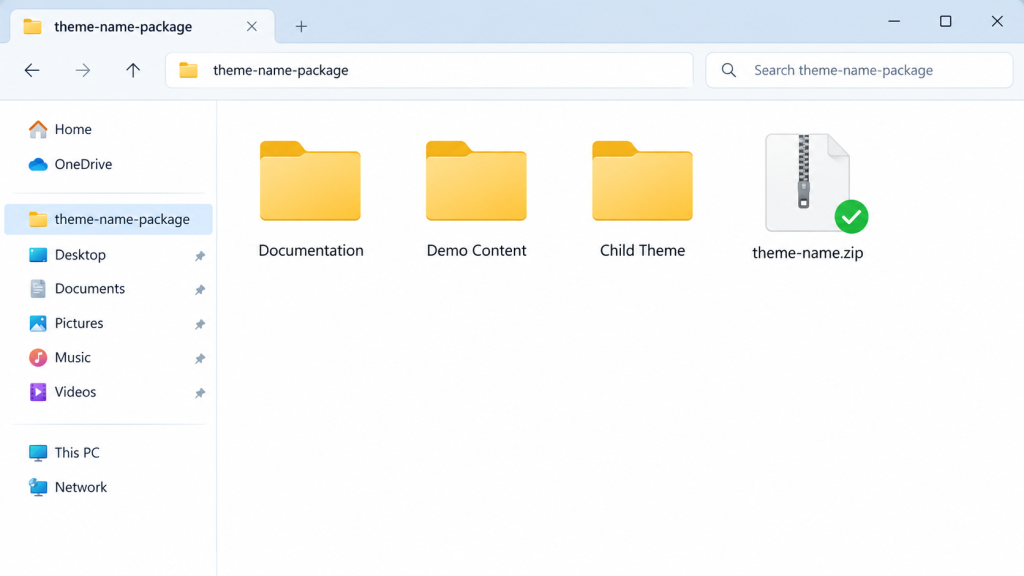
Important: Some sellers give you a big ZIP file. It has the theme, documentation, child theme, and demo files. Do not upload this full package. Unzip it once on your computer. Inside, find the real theme ZIP. It usually has the theme name, like “theme-name.zip”. Upload only this one.
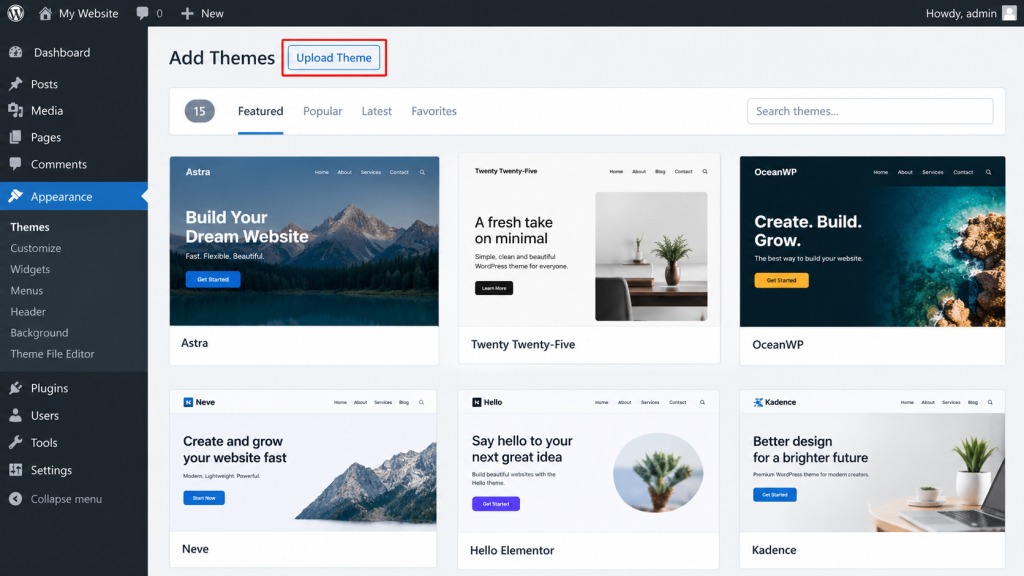
Now go to your dashboard. Click Appearance → Themes. Then click on “Add New Theme”.
At the top of the page, you can see the “Upload Theme” button. Click on it.
An upload box will appear. Click “Choose File” and select the theme ZIP file from your computer. Then click “Install Now”.
[Image: The upload box with the “Choose File” button and a selected file “theme-name.zip”. The “Install Now” button is highlighted.]
WordPress will upload and unpack the theme. It takes a few seconds. When it is done, you can see a success message. Click on “Activate”. That’s it!
[Image: Success screen with the text “Theme installed successfully” and the “Live Preview” and “Activate” links.]
Tip: Do you already have an older version of the same theme? WordPress will ask you to replace it. Click “Replace active with uploaded”. This is an easy way to update a premium theme.
Note for local host: This method works without internet. The ZIP file is already on your computer.
How to Install WordPress Theme with FTP
FTP is useful when the dashboard upload fails. For example, your theme file is too big. Or you get an upload error. FTP lets you put the theme folder straight into your server.
You need an FTP client for this. FileZilla is free and popular. You also need your FTP details. You can find them in your hosting account. The details are:
- Host (or server address)
- Username
- Password
- Port (usually 21 for FTP, or 22 for SFTP)
If your host gives SFTP, use it. It is more secure.
Step 1: Unzip the theme file on your computer. You will get a folder with the theme name. Open it and check. You should see files like style.css and functions.php (or theme.json for block themes). If you see another folder inside, use that inner folder.
[Image: An unzipped theme folder open on the computer. The files style.css, functions.php, index.php, and screenshot.png are visible.]
Step 2: Open FileZilla. Enter your host, username, password, and port at the top. Click “Quickconnect”.
[Image: FileZilla top bar with the Host, Username, Password, and Port fields filled with sample data. The “Quickconnect” button is highlighted.]
Step 3: After connecting, you can see two sides. The left side is your computer. The right side is your server. On the right side, go to your WordPress folder. It is often called public_html or www. Then open wp-content → themes.
Step 4: On the left side, find your unzipped theme folder. Drag it to the right side, inside the themes folder. Wait until the upload finishes. You can see the progress at the bottom.
[Image: FileZilla with two panels. The left panel shows the local theme folder. The right panel shows /public_html/wp-content/themes/. An arrow shows the folder being dragged from left to right.]
Step 5: Now go to your WordPress dashboard. Click Appearance → Themes. You can see your new theme there. Hover over it and click “Activate”. Done!
Note for local host: You do not need FTP on a local host. Just copy the theme folder into wp-content/themes inside your local site folder.
How to Install WordPress Theme with cPanel
Don’t want to install an FTP app? Then use cPanel. Most shared hosting gives you cPanel. It has a File Manager. It works like FTP, but inside your browser.
Step 1: Log in to your hosting account and open cPanel. Find the “Files” section. Click on “File Manager”.
[Image: cPanel home screen. The “Files” section is visible, and the “File Manager” icon is marked with a red box.]
Step 2: In File Manager, open public_html. This is your main WordPress folder in most cases. Then go to wp-content → themes.
Step 3: Click the “Upload” button at the top. A new tab will open. Select your theme ZIP file from your computer. Wait until the progress bar becomes 100% and green.
[Image: cPanel File Manager inside /public_html/wp-content/themes/. The “Upload” button in the top toolbar is highlighted.]
Step 4: Go back to the File Manager tab. Click “Reload” if you do not see the file. Now right-click on the ZIP file and select “Extract”. Keep the path as it is and click “Extract File(s)”.
[Image: Right-click menu on “theme-name.zip” inside File Manager. The “Extract” option is highlighted.]
Step 5: Now you have a new theme folder. Check it once. The theme files should be directly inside this folder, not inside another folder. After that, delete the ZIP file. It is not needed anymore.
Step 6: Go to your WordPress dashboard. Click Appearance → Themes. Find your theme and click “Activate”. That’s all!
Tip: Some hosts use their own panel, like hPanel or Plesk. The steps are almost the same. Look for “File Manager” there.
How to Install Envato WordPress Theme
Envato’s ThemeForest is a big marketplace for premium WordPress themes. Many people buy themes from there. The install is easy. But many people upload the wrong file. So, follow the steps carefully.
Step 1: Log in to your Envato account. Click on your username and go to “Downloads”.
[Image: ThemeForest account menu. The “Downloads” option is marked with a red arrow.]
Step 2: Find your theme in the list. Click the “Download” button. You can see two options:
- All files & documentation – the full package with docs and extra files
- Installable WordPress file only – only the theme ZIP
Choose “Installable WordPress file only”. This is the file you need to upload.
[Image: The Download dropdown on the ThemeForest Downloads page. Two options are shown, and “Installable WordPress file only” is highlighted.]
Step 3: Now install this ZIP file. Go to Appearance → Themes → Add New Theme → Upload Theme. It is the same as our “Install from Download” method above. If the file is too big, use the FTP or cPanel method.
Step 4: Activate the theme. Most premium themes will now ask you to install some plugins. These are required or recommended plugins, like a page builder or a demo importer. Click “Begin installing plugins” and follow the steps.
[Image: WordPress dashboard notice at the top: “This theme requires the following plugins” with the “Begin installing plugins” link highlighted.]
Step 5: Activate your license. Many themes ask for the purchase code. You can find it in Envato Downloads → Download → “License certificate & purchase code”. Paste it into the theme’s welcome or license page.
Step 6 (optional): Import the demo. Most themes have a one-click demo import. It makes your site look like the theme demo. Then you only need to change the text and images.
Get updates easily: Envato has a free plugin called Envato Market. It lets you install and update your Envato themes from the dashboard. Download it from Envato, install it like a normal plugin, and connect it with your Envato token.
How to Install WordPress Theme with WP-CLI
WP-CLI is a command-line tool for WordPress. It is for developers. But it is very fast. Many hosts have WP-CLI ready over SSH. Local tools like LocalWP also give you a WP-CLI shell.
Open your terminal and go to your WordPress folder. Then run this command:
wp theme install astra –activate
Here, “astra” is the theme slug from the WordPress directory. Change it to your theme’s slug. The “–activate” part activates the theme at the same time.
You can install a ZIP file too:
wp theme install /path/to/theme-name.zip –activate
To see all installed themes, run “wp theme list”.
[Image: A terminal window showing the command “wp theme install astra –activate” and the success messages “Theme installed successfully” and “Success: Switched to ‘Astra’ theme”.]
How to Install WordPress Theme from Your Hosting Panel
Some managed WordPress hosts have their own tools. For example, some hosts let you install a theme while you set up WordPress. Others have a WordPress manager or staging tool with theme options. Check your hosting dashboard. If you see a WordPress section, look for “Themes” there.
This method is good for beginners. But the options are different for each host. So, we recommend the dashboard method above for most people.
Common Error and Solution
We have shown you all the methods that you can use to install a WordPress theme. Now, there might be some errors while installing the theme. Don’t worry. Most of them are easy to fix. Before you fix anything, take a backup of your site. Safety first!
[Image: Infographic with 10 small cards, each with an error name and a warning icon. Title: “Common WordPress Theme Installation Errors”.]
The Death’s White Screen WordPress Error
This is also called the “White Screen of Death”. Your site shows a blank white page. No error message. Most of the time, a theme or plugin causes it.
Solution:
- Log in with FTP or cPanel File Manager.
- Go to wp-content → themes.
- Rename your new theme folder. For example, “theme-name-old”.
- WordPress will switch to a default theme. Your site should come back.
- If it is still white, rename the plugins folder to “plugins-old”. Then check again.
You can also turn on debug mode. Add this line to wp-config.php to see the real error:
define( ‘WP_DEBUG’, true );
Turn it off again after fixing.
[Image: A browser window with a completely white page. A small label says “White Screen of Death”.]
Memory Limit WordPress Error
You may see “Allowed memory size exhausted”. It means WordPress needs more PHP memory. Big premium themes and page builders often need more memory.
Solution: Open wp-config.php. Add this line before “That’s all, stop editing!”:
define( ‘WP_MEMORY_LIMIT’, ‘256M’ );
Save the file and try again. If it does not work, your host may have a lower limit. Ask your hosting support to increase it.
Error Establishing Database Connection
This error means WordPress cannot talk to the database. The theme is not the reason most of the time. But it may show after you move or set up a site.
Solution:
- Open wp-config.php. Check DB_NAME, DB_USER, DB_PASSWORD, and DB_HOST. They must match your hosting database details.
- Check if your database server is running. On a local host, start MySQL from your local tool.
- Ask your host. Sometimes the database server is down for a short time.
[Image: A plain white page with the heading text “Error establishing a database connection”.]
Exceeded Maximum Upload File Size
You may see “The uploaded file exceeds the upload_max_filesize directive in php.ini”. It means your theme ZIP is bigger than your server allows.
Solution: Pick one:
- Use the FTP or cPanel method. They skip this limit.
- Increase the limit from your hosting panel. In cPanel, look for “Select PHP Version” or “MultiPHP INI Editor”. Set upload_max_filesize and post_max_size to 64M or more.
- Check if you are uploading the full package. Upload only the installable theme ZIP.
[Image: cPanel MultiPHP INI Editor with “upload_max_filesize” set to 64M and “post_max_size” set to 64M.]
Maximum Execution Time Exceeded
The error says “Maximum execution time of 30 seconds exceeded”. The server stops the task because it takes too long. It often happens on slow servers or with big themes.
Solution: Increase max_execution_time to 300 from your hosting PHP settings. Or add this line to your .htaccess file:
php_value max_execution_time 300
If it still fails, use FTP to upload the theme.
Connection Timed Out WordPress Error
The page loads for a long time and then shows “Connection timed out”. Your server is too busy. This is common on cheap shared hosting.
Solution:
- Increase the PHP memory limit (see above).
- Deactivate heavy plugins for a while.
- Switch to a default theme to test.
- If it happens often, think about better hosting.
Destination Folder Already Exists
You see “Destination folder already exists”. It means a folder with the same theme name is already in wp-content/themes. Maybe from an old or failed install.
Solution: In newer WordPress, you may get a “Replace active with uploaded” option. Use it if you see it. If not, go to File Manager or FTP. Open wp-content → themes. Delete or rename the old theme folder. Then upload again.
[Image: WordPress upload screen with the message “Destination folder already exists” and “Theme installation failed”.]
The Package Could Not Be Installed
The full message is often “The package could not be installed. The theme is missing the style.css stylesheet.” This is very common. It means you uploaded the wrong ZIP.
Solution: Unzip the package on your computer. Find the real theme ZIP inside. Upload only that file. For Envato, download “Installable WordPress file only”. Also, make sure the ZIP has the theme files directly inside it.
[Image: Error screen with “The package could not be installed. The theme is missing the style.css stylesheet.” highlighted in red.]
Maintenance Mode WordPress Error
Your site shows “Briefly unavailable for scheduled maintenance. Check back in a minute.” WordPress puts the site in maintenance mode during installs and updates. If the process breaks, it gets stuck.
Solution: Go to your WordPress root folder with FTP or File Manager. Find a file named .maintenance. Delete it. Your site will come back. If you do not see it, turn on “Show Hidden Files” in File Manager settings.
[Image: cPanel File Manager in public_html with the “.maintenance” file selected and the “Delete” button highlighted.]
WordPress Critical Website Error
You see “There has been a critical error on this website.” This is a PHP fatal error. A new theme often causes it. For example, the theme needs a newer PHP version.
Solution:
- Check your admin email. WordPress sends a recovery mode link. Use it to log in and switch the theme.
- No email? Rename the theme folder with FTP or File Manager.
- Check the theme’s required PHP version. Update PHP from your hosting panel if needed.
- Turn on WP_DEBUG to see the exact error.
[Image: A white page with the text “There has been a critical error on this website. Learn more about troubleshooting WordPress.”]
Conclusion
Now you know how to install a WordPress theme in many ways. For a free theme, use the WordPress directory. For a premium theme, upload the ZIP file. If the upload fails, use FTP or cPanel. Developers can use WP-CLI to save time.
Also, you should know how to fix the common errors. Most errors come from the wrong ZIP file, low server limits, or a theme conflict. So, always check these three first. And always keep a backup before changing your theme.
We hope this guide helped you. If you still face any problems, let us know in the comment box.
FAQ
Can I install more than one theme? Yes. You can install many themes. But only one theme can be active at a time.
Will I lose my content if I change the theme? No. Your posts, pages, and media stay safe. But some design settings and widgets may change. So, check your site after switching.
Should I delete unused themes? Yes. Unused themes can be a security risk if you don’t update them. Keep one default theme as a backup and delete the rest.
What is a child theme? A child theme keeps your custom changes safe when the main theme updates. Install the parent theme first. Then install and activate the child theme.
Can I install a theme from my phone? Yes. The WordPress dashboard works in a mobile browser. The directory and upload methods work the same way.